Hidden Excel: Spreadsheet Compare

Capture2

This hidden gem,  (available with Office Professional 2013,  2016, and Office 365 ProPlus) makes it easy to compare two workbooks, interactively. You can see how values, formulas, and formatting differ – line by line, and cell by cell, highlighting just the type of differences you specify.

To Use Spreadsheet Compare

  1. Find and launch the app by clicking Start then typing ‘Spreadsheet Compare’.
  2. Click Compare Files. The Compare Files dialog appears.
    Capture
  3. Click the folder icon to select the older and newer files, then click OK.

Cheers

quincy

Related Posts

  1. Hidden Excel: Find Date Differences with DATEDIF
  2. Excel Text Functions 1 of 4: =LEFT() and =RIGHT()
  3. Using Histogram for Data Analysis

Midyear Roundup: My Best Dates

Some of my fave Excel Date Functions. Some old, some new; all designed to help track the passage of time.

Date Functions:

EOMONTH
returns the last day of the month
EOMONTH ( start_date , month )
EDATE
returns the date x number of months before/after a given date
 EDATE ( start_date , months )
NETWORKDAYS
calculates the number of working days
(see also NETWORKDAYS.INTL)
 NETWORKDAYS ( start_date , end_date , [holidays] )
TODAY
returns the current date
 TODAY( )
WEEKNUM
returns serial number for a given week
 WEEKNUM ( date , [week_start] )
WORKDAY
calculates the next valid work day
(see also WORKDAY.INTL)
WORKDAY( start_date, days, [holidays] )


YEARFRAC
returns the date as a fraction of the year
 YEARFRAC ( start_date , end_date , [basis])

Cheers!

hɔuᴉnb

Additional reading:

Comments and questions are always welcome!

Calculating Total Working Days (NETWORKDAYS)

Calculate the difference between two dates, exempting the weekends and holidays, using =NETWORKDAYS

Using NETWORKDAYS function:

  • Format: =NETWORKDAYS ( date1, date2, holidays)
  • date1 must be the earlier of the two dates.
  • holidays is an optional argument

Cheers!

hɔuᴉnb

Additional reading:

Comments questions (and magik tricks) are always welcome!

Hidden Excel: Find Date Differences with DATEDIF

In honor of the 40th anniversary of J.K. Rowling’s seminal classic, Harry Potter, this post magically exposes a hidden excel function!

Date Difference between J.K. Rowling’s Birthday and Harry Potter Movie Debut

Ever wonder if your spreadsheet is keeping something from you?

DATEDIF is an under-documented function. It allows  you to calculate the difference between two dates. Although it doesn’t appear in the Function Wizard (it exists to insure backward compatibility with Lotus and earlier Excel versions) it is a powerhouse when it comes to calculating date differences.

Using DATEDIF function:

  • Format: =DATEDIF ( date1, date2, “interval”)
  • date1 must be the earlier of the two dates or an #NUM error is returned.

Interval Arguments:

y Years
m Months
d Days
ym Months, years excluded
yd Days, years excluded
md Days, years and months excluded

Cheers!

hɔuᴉnb

Additional reading:

Comments and questions are always welcome!

Speak Thai, Latin and Arabic with Excel.

ROMAN-Starwars.gif

Ever wonder what your birthday looks like expressed in roman numerals? Want to display your travel expenses using Thai?

BAHTTEXT.gif

Use these functions to convert numbers to their respective lingo.

Formula Description Example Result
BAHTTEXT Converts number to Thai text =BAHTTEXT(451) สี่ร้อยห้าสิบเอ็ดบาทถ้วน
(Four Hundred and Fifty-one)
ARABIC Convert Roman Numeral to Arabic =ARABIC(MCDXCII) 1492
ROMAN Convert Number to Roman Numeral =ROMAN(1984 , [0] )* MCMLXXXIV

*ROMAN, has an optional argument, format . When format is included, the number is expressed differently, ranging from classic (0) to simplest (4). When this argument is omitted, the classical format is displayed.

Cheers!

hɔuᴉnb

Additional reading:

Comments and questions are always welcome!

Cascading Data Validation Lists

..with thanks to  Melodie S. for her help with this post.

A dear associate of mine asked for assistance with the following: How can you dynamically link a validation list, so that choices in one column control the list displayed in another?

Cascading Data Validation Lists3

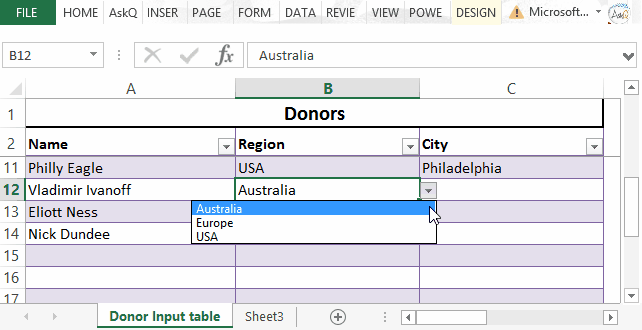
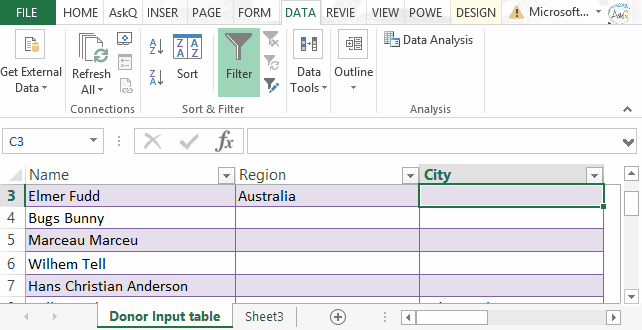
The example above illustrates a Region – City validation list. The selection of USA in the Region column will display only U.S. Cities; selecting Europe will display only European ones.

The first step is to create Defined Names for the Regions and each of the City groups.
Cascading List - Named Ranges

Creating Defined Names:

  1. Select the cells that make up the list. Do not include the list header in your selection.
    For example, to create the Region list in the above example, select E3:E5. 
  2. Click in the Name Drop-down.
  3. Type a name for the list and press Enter.
    Note: Names must begin with a letter and should not include spaces.
  4. Repeat steps 1-3 for each list (i.e., USA, Europe, Australia).

=INDIRECT(ref): Returns the reference specified by a text string.

Using the INDIRECT function to reference the value in the Region column (e.g, Australia), the data validation list will display contents of the matching defined name (e.g., Brisbane, Perth, etc.)

cascading list validation dialogs

Creating the Data Validation Lists:

  1. For the first input column (e.g., Region) select the the cells where data will be input (e.g., B3:B15).
  2. On the Data tab, in the Data Tools group, click Data Validation. The Data Validation dialog appears.
  3. Click the Allow drop-down and select List.
  4. In the Source field type ‘=‘ followed by the appropriate Defined Name (i.e., =Region )
  5. Click OK.
  6. For the second input column (e.g., City) select the the cells where data is to be input (e.g., C3:C15).
  7. On the Data tab, in the Data Tools group, click Data Validation. The Data Validation dialog appears.
  8. Click the Allow drop-down and select List.
  9. Click in the Source field, type ‘=INDIRECT( ref ), where ref is the cell reference of the first Input cell in the prior column; e.g., =INDIRECT(B3) .
  10. Click OK.

Cheers!

hɔuᴉnb

Additional reading:

Excel Text 4 of 4: Using SUBSTITUTE to Parse Text

Excel is great at splitting text across multiple columns. For basic text separation (e.g. putting first and last name in separate columns) the LEFT and RIGHT functions work fine. But these functions fall short when applied to data that follow an inconsistent pattern. In the below example, the errant inclusion of a middle name wrecks havoc with our formula results.

Text4Substitute(2)

Using the SUBSTITUTE function one can identify and replace the last space in the cell with a uniquely identifying character (e.g., an underscore). This character can then be used as a delimiter to separate Lastname from full name.

ScreenShot-2015-Jun-03-126-AM

SUBSTITUTE: replace character(s) within a cell with specified character(s)

= SUBSTITUTE ( text, old text, new text, instance)
Note, instance is optional; when omitted, every occurrence of old text is replaced with the new.

Examples:

  • =SUBSTITUTE(“Mad Max”, a,i) returns Mid Mix
  • =SUBSTITUTE(“mississippi, i,“”) returns msssspp
  • =SUBSTITUTE(“banana”, a,Q”,2) returns banQna
LEN Counts the number of characters =LEN(antidisestablishmentarianism) returns 28

Click here for a 5 minute tutorial:

Cheers!

hɔuᴉnb

Additional reading:

%d bloggers like this: