By now, I am likely suffering the ill effects of an Egg Nog induced coma, so in my cognitive absence, I present the most read posts from the year. Enjoy and thanks for reading!
and because nothing cures a New Year’s hangover better than an AskQ post!
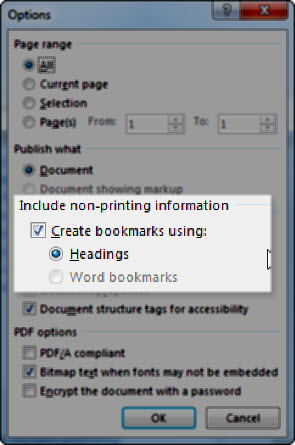
In addition to making it easy to generate PDF bookmarks from a Word document (click link to see how) , Headings and Bookmarks afford your reviewers an easy method of navigation.
Here are shortcuts to Applying Heading Styles and Creating Bookmarks.
To quickly apply Heading styles
Select the item by placing insertion point anywhere on that line of text (Heading styles will auto-apply to the entire paragraph).
Hold CTRL and SHIFT down and press 1, 2, or 3 to apply that corresponding outline level (e.g., CTRL+SHIFT+2 applies Heading 2 style).
Note, only the first 3 Heading styles have shortcut keystrokes pre-assigned to them. Alternatively, you can also Press CTRL + SHIFT + S (Apply Style shortcut) then select or enter the style name.
To create Bookmarks
Select the text to bookmark. Note: Unlike Heading Styles, you must select all text to be included in the bookmark.
Press CTRL + SHIFT + F5. The Bookmark dialog appears.
Enter your bookmark name:
-name can contain only letters and/or numbers
-name cannot begin with a number
Click Add.
Note: If you use the same name as an existing bookmark the original will be overwriten without warning.
An earlier post showed an easy keyboard shortcut for creating bookmarks. Here’s an even easier method of creating a PDF from a Word document, where the bookmarks, practically, create themselves. And the beauty of it is that it preserves the outline hierarchy (i.e. creates indented bookmarks) as defined in your document.
Note:The document must either be in outline format (with Heading styles), or formatted with Word-generated bookmarks.
Reformatting a list of names is challenging when some of the names have middle names and others do not. Using Word’s Advanced Replace dialog and wildcards makes it easy to rewrite a list in Lastname, First M. format.
3 minute e-Learning demo:
To Reformat a List of Names to Last, First M.
Select your list of names.
Press CTRL+H. The REPLACE dialog appears.
If necessary click More button to display full dialog.
Check Use Wildcards.
In the Find what field type: (*) ([! ]@)^13 Important:observe spaces.
In the Replace with field type:\2, \1^p Important:note thespace after the comma.
Click Replace All. When prompted to “..continue searching the remainder of the document” click No.
Close the dialog.
Why it works
The find pattern looks for two groups: first name with optional middle name or initial and last name.
(*)_ finds expression1, first and middles names
([!_]@)^13 finds expression2, the remainder of name up to and including hard return (ascii char 13)
These names can now be referred to as expressions \1 and \2. In our replace statement we transpose them, separate them with a comma and space, and end with a hard return (^p).
\2,_\1^p
Note: _ is used above to illustrate use of space.
Codes that work with Find and Replace
To find
Type
Paragraph mark ( )
^p (doesn’t work in the Find what box when the Use wildcards option is turned on), or ^13
One or more occurrences of the previous character or expression
@ ex: lo@t finds lot and loot.
Any single character except the characters in the range inside the brackets
[!_] ex: t[!a-g]ck finds tock and tuck, but not tack or tick.
Locate the image to serve as bullet and save to a local drive.
Tip: for best results, seek medium or small sized images with transparency (i.e. PNG, GIF).
Select your list, then, on the Home tab, click Bullets to format with default bullet style.
Place cursor on blank line, click Insert and then Picture. Navigate to your custom bullet image and click Open.
Using the corner selection handle resize the image to an appropriate size.
Click + drag image onto one of the bullets in your list; you’ll recognize you’ve hit the target when the bullet area turns grey.
Looking for an easy way to highlight a column that is not in a table? Use COLUMN SELECT
Note: This tip works equally well when editing an email in Outlook.
Looking for an easy way to highlight a column that is not in a table? Use COLUMN SELECT
Click to enlarge
Column Select
Click insertion point at begining of text
Press ALT as you CLICK + DRAG to end point.
Once selected the text can be formatted or deleted. The selection collapses after your executed command.
Be smooth: ALT+CLICK instruction brings up the Thesaurus*, so be don’t click quickly. Column Select (ALT + CLICK + DRAG) works best to when you use a smooth, paint-like motion (more like Pollock than Seurat)
*(a deadly neolithic creature hellbent on correcting ingesting your text and regurgitating its own).
Want to show page count in a multi-section document?
On the distant heels of my renumbering slides post, here are instructions to create Page x of y style numbering in a multiple section document. In a simpler document (one without section breaks), you could easily create the ‘Page 3 of 7’ type numbering using the NumPages field. NumPages, however, counts total number of pages in the document and not in each section.
‘SectionPages,’ to the rescue!
click to enlarge
Insert Page x of y Numbering in a Multiple Section Document.
On the Insert tab, click Footer and select Edit Footer. The cursor will move to the footer of the current section.
Position your cursor where you want to place the page number.
On the Header & Footer Tools: Design tab, in the Header & Footer group, click Page Number, Current Position, and select Plain Number. The page number field is inserted, reflecting the current page number.*
Type ‘ of ‘ (no quotes) after the page number.
On the Header & Footer Tools: Design tab, in the Insert group, click Quick Parts, and select Field.
Select Numbering in theCategoriesdrop-down and SectionPages from the Field names area, then click OK. The SectionPages field is added to the footer using the default numeric format.
*Restart numbering , if necessary: Click Page Number, select Format Page Number, and change Page Numbering to Start at: 1.


 )
) Jazz up your bulleted list


