Acrobat Page Numbering

Often times, a PDF’s pagination doesn’t match the pagination as displayed in document. For example, a document containing caption, contents and authorities pages, may have its first narrative page set 7 pages into the file. This makes navigation problematic.

Many courts now require that the PDF page numbering match the original document pagination. Follow these instructions to renumber your PDF.

To Renumber Pages in an Acrobat PDF

To label or suspend numbering for an un-numbered page
(e.g. Caption pages)

  1. Display Page Thumbnails by clicking Thumbnails icon at left.
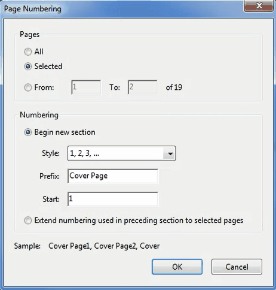
  2. RT+CLICK on the page thumbnail and select Number pages. The Page Numbering dialog appears.
  3. In the Pages section choose ‘Selected’.
  4. In the Numbering section select ‘Begin new section’.
  5. Click Style drop-down and select None.
  6. Set Prefix to appropriate label (e.g., Caption, CoverPg, etc.) or leave blank.
  7. Click OK.

To renumber pages within a section (e.g., Table of Contents)

  1. Display Page Thumbnails by clicking Thumbnails icon at left.
  2. To select multiple pages, click on the first page of the section, then scroll down and SHIFT+CLICK on the last page.
  3. RT+CLICK on one of the selected thumbnail pages and select Number pages. The Page Numbering dialog appears.
  4. In the Pages section choose ‘Selected’.
  5. In the Numbering section select ‘Begin new section’.
  6. Click Style drop-down and select desired format (e.g., i ii iii).
  7. Set Prefix to blank (i,e. leave this field empty).
  8. Set Start to ‘1’.
  9. Click OK.

Cheers!

hɔuᴉnb

Related posts:

Comments and questions are always welcome!

Heading and Bookmark Shortcuts

In addition to making it easy to generate PDF bookmarks from a Word document (click link to see  how)Headings and Bookmarks afford your reviewers an easy method of navigation.

headings-and-bookmarks

Here are shortcuts to Applying Heading Styles and Creating Bookmarks.

To quickly apply Heading styles

  1. Select the item by placing insertion point anywhere on that line of text (Heading styles will auto-apply to the entire paragraph).
  2. Hold CTRL and SHIFT down and press 1, 2, or 3 to apply that corresponding outline level (e.g., CTRL+SHIFT+2 applies Heading 2 style).

Note, only the first 3 Heading styles have shortcut keystrokes pre-assigned to them. Alternatively, you can also Press CTRL + SHIFT + S (Apply Style shortcut) then select or enter the style name.

To create Bookmarks

  1. Select the text to bookmark.
    Note: Unlike Heading Styles, you must select all text to be included in the bookmark.
  2. Press CTRL + SHIFT + F5. The Bookmark dialog appears.
  3. Enter your bookmark name:
    -name can contain only letters and/or numbers
    -name cannot begin with a number
  4. Click Add.

Note: If you use the same name as an existing bookmark the original will be overwriten without warning.

Cheers!

hɔuᴉnb

Related posts:

Comments and questions are always welcome!

Auto-generate Bookmarks in an Acrobat PDF

autobookmarking-in-acrobat


An earlier post showed an easy keyboard shortcut for creating bookmarks. Here’s an even easier method of creating a PDF from a Word document, where the bookmarks, practically, create themselves. And the beauty of it is that it preserves the outline hierarchy (i.e. creates indented bookmarks) as defined in your document.

Note: The document must either be in outline format (with Heading styles), or formatted with Word-generated bookmarks.

Click here to watch ~1 minute demo

Converting your Word Document into a PDF with Bookmarks

  1. In Word: click File, Save As, then Browse to select a folder to save to.
  2. On the Save As dialog, in the File name area, enter the file name.
  3. Click the Save as type drop-down and select PDF (*.pdf).
  4. Click Options…
    autobkmrk1-options
  5. Check Create bookmarks using: and select Headings.
  6. Click OK.
  7. Click Save.

Cheers!

hɔuᴉnb

Related posts:

Comments and questions are always welcome!

PDF Bookmarks Made Easy

Here’s a quick and easy method to create a bookmarks in Acrobat Professional and Nuance PDF Pro.

CreateBookmark491a

Creating a Bookmark

  1. Using the Select tool Select, select the text to bookmark.
  2. Press CTRL + B.

The bookmark reference is created from the selected text. CLICK + DRAG the reference to arrange, demote, or promote the bookmark.

Cheers!

hɔuᴉnb

Related posts:

Comments and questions are always welcome!

More Windows Key Shortcuts

computer_key_Windows 

Here are two favorite shortcuts of mine. Both feature the underutilized Windows Key .

To Open an Explorer Window

  • Hold the Windows Key and press ‘E‘.

This combination offers a fast(er) way to get to your files and folders.

Explorer

To Open a ‘Run’ window

  • Hold the Windows Key and press ‘R‘.

To launch a program or access a file (provided you have the program name or file path), use this Windows Key combo.

Notepad


Cheers!
hɔuᴉnb

WinEvolution

Comments and questions are always welcome!

Additional recommended reading:

PowerPoint: Set Transparency

Whitespace (or any other background color) can make your inserted images look like a kindergarten stickers. Solution: remove unwanted colors using Set Transparency.

Watch this 60 second video to learn all you need to know

  1. Select the picture or image to be edited.
  2. On the Ribbon, click on the Picture Tools: Format tab.
  3. In the Adjust group click Color (or Recolor, in version 2007) and select Set Transparent Color.
  4. On the selected image, click on the color to remove (i.e. make transparent). That color is erased from the selected image.

Cheers!

hɔuᴉnb

Comments and questions are always welcome!

Related:

Duplicate in PowerPoint

Here’s a quick PowerPoint time saver: Press CTRL + D to duplicate an object.

  1. Insert, resize and move object (i.e., shape or picture) to desired location on slide.
  2. With the object selected, press CTRL + D. A duplicate will appear, slightly offset from the first.
  3. Move the duplicate to preferred distance from original; keep this object selected.
  4. Press CTRL + D again. The next duplicate (triplicate?) appears positioned equidistant from the last.

Repeat final step, as necessary.

Tip: CTRL + D is a CUA (common user access) instruction in many Graphic and Desktop Publishing programs (e.g., Visio, Photoshop).

 Cheers!

hɔuᴉnb

Comments and questions are always welcome!

Related:

%d bloggers like this: