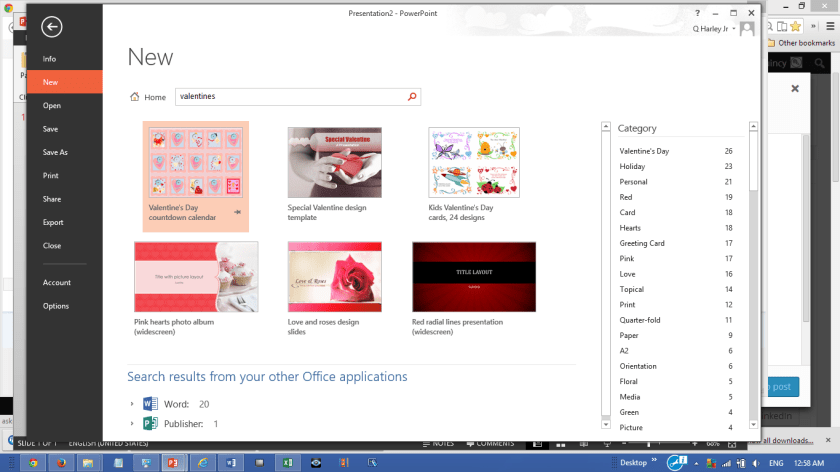
Has Valentine’s day snuck up on you this year? Are you buried under too much snow to card shop? Borrow from Microsoft’s templates. Word and PowerPoint have hundreds of print-ready and animated templates to choose from.
Word 2013 TemplatesPowerPoint 2013 Templates
To Download and Create a Valentine
In either Word or PowerPoint, click File tab and select New.
In the Search bar enter Valentine and press Search icon.
Here’s another interesting challenge presented by a colleague. The same footnote text applied to many items on that page. She wanted to use the same footnote reference twice, with the same number. Here are two solutions. The first (and easier) method is to use a custom mark or symbol (e.g. *, †, etc.). The second method is to use a cross-reference.
Watch this 2m video to learn all you need to know!
Inserting Duplicate Footnote using Symbols.
On the Reference tab, in the Footnotes group, click the Dialog Launcher. The Footnote and Endnote dialog will appear.
In the Custom Mark field type the preferred number or symbol. Alternatively, click Symbol button, select character and click OK.
Click the Insert button. The footnote reference mark is added to document at the insertion point.
Enter the footnote text.
In the body of the document click insertion point where duplicate footnote reference is to appear.
Type duplicate number or, on the Insert tab, click Symbol and select symbol previously selected.
Inserting Duplicate Footnotes using Same Sequence Number.
Insert the first footnote: On the Reference tab, in the Footnotes group, click Insert Footnote. The footnote number is added to document at the insertion point.
Enter the footnote text.
Click insertion point in the body of the document where duplicate footnote number is to appear.
On the Reference tab, in the Captions group, click Cross-references. The Cross-references dialog will appear.
For Reference type select ‘Footnote’and for Insert reference to select ‘Footnote number’.
Select desired footnote from the For which footnote area, thenclick Insert.
Click Close button.
Note Apply the Footnote Reference style to the duplicates to match footnote formatting.
A colleague presented me with interesting challenge: An attorney she was working with entered comments into a document as parenthetical phrases. That is to say, the comments were entered ‘inline’, within parentheses and not by using Word’s INSERT COMMENT feature. Having already actioned the comments, she was looking for a simple method to find and remove all the parenthetical text.
Is it possible to search for and delete an unknown string of text, given the first and last characters ?
Yes!
Advanced Find and Wildcards to the rescue.
So our goal: find an open and close parentheses, including all that stuff in the middle, and replace it with nothing (essentially, deleting it).
Using Advanced Find and wildcards to delete text.
Press CTRL + F to display the Navigation Pane.
Click the drop-down to the right of the search icon and select Advanced Find. The Find and Replace dialog appears.
If necessary, click the More button to display additional options.
Check the Use Wildcards check-box.
In the Find What area enter \(*\) Note: Usually, when conducting a wildcard search, the parenthesis is used to denote an expression. The backslash “\” is used to indicate when a search device (in this case, the parenthesis) is to be taken literally.
Click Find Next, then click Replace to delete selectively or Replace All to do so en masse.
Note when using wildcards the Find What text is case sensitive.
Additional Wildcards:
To find
Type
Example
Any character
?
s?t finds satand set
Any string of characters
*
s*d finds sadand started
The beginning of a word
<
<(inter) finds interestingand intercept, but not splintered
The end of a word
>
(in)> finds inand within, but not interesting
One of the specified characters
[ ]
w[io]n finds winand won
Any single character in this range
[-]
[r-u]ight finds right, sightand tight
One or more occurrences of the previous character or expression
Let’s profile two of Word’s newer design features: Stylistic Sets and Ligatures. These features, introduced in Word 2010 and available to documents saved in .DOCX format, leverage the newer OpenType font standard. Using these features, you can enhance and embellish select text.
Stylistic Sets
Certain OpenType fonts (e.g., Calibri, Gabriola, Cambria, etc.) have additionalembedded appearance options, called Stylistic Sets. These sets enable subtle (and not so subtle) appearance changes, based on Stylistic Set selection, character spacing and letter combination.
Gabriola font with different Stylistic Sets applied
To apply a Stylistic Set
Select text.
On the Home tab of the Ribbon, in the Font group, click the Text Effects and Typography button. Alternatively, you can press CTRL + D to launch the Font dialog box, and then click the Advanced tab.
Point to Stylistic Sets and select desired set.
Ligatures
A Ligature consists of two or more letters commonly joined together in written text. Back in the days of movable type, these characters where forged one a single printing press block, also known as ‘glyph’, to save time and space. Some common examples include Æ, Œ , ƒƒ, and my personal favorite, Qu.
In Word, ligatures are categorized as:
Standard, contains the ligatures that most typographers and font designers agree are appropriate for that language.
Contextual, ligatures that the font designer believed appropriate for use with that font.
Historical, ligatures for language that was once standard but is no longer commonly used (e.g., ‘ye olde theatre’)
Discretionary, ligatures that the font designer included for specific purposes.
Here’s a sentence using Calibri, with all ligature categories applied.
Calibri font with different ligature types selelcted
To apply a Ligature
Select text.
On the Home tab of the Ribbon, in the Font group, click the Text Effects and Typography button. Alternatively, you can press CTRL + D to launch the Font dialog box, and then click the Advanced tab.
Looking for an easy method to move a table row up?
Place cursor on the row.
Press ALT + SHIFT + Up Arrow.
Repeat as necessary until the cursor is elevated to desired position. As you probably guessed, pressing ALT + SHIFT + Down Arrow moves the selected row down.
This trick is not just limited to tables. It also works with:
Bulleted text
Numbered lists
Outline text
Non-numbered paragraphs
IQ points
Okay, admittedly that last one was just wishful thinking :).
*Tip applies to Word versions 2003, 2007, 2010, and 2013. This tip may be relevant in earlier Word versions, but to confirm this I would have to pull out my old PC from its resting spot, on a shelf, under a pair of acid-wash jeans, wedged between an un-seeded Chia Pet and my Commodore VIC 20.
Here’s a quick Office tip that applies to Word, Excel and PowerPoint.
The Mark as Final feature enables you to protect a document to discourage editing. This simple seal of protectioncan easily be removed by the reader, should it be determined editing is necessary.
Note, this option is not designed to prevent edits, only to ward against unintentional editing. To render the document un-editable use other alternatives (for example, saving the file password protected or distributing a PDF version of the file).
To Apply Mark as Final
On the File tab, scroll down to Info, click Protect and select Mark as Final. A dialog will appear indicating “the file will be marked as final and saved.”
Click OK to confirm.
When backstage view is active, a notice appears in the status bar, indicating, “An author has marked this … as final to discourage editing.” The Application title bar also indicates that the file is Read-only. Reading, printing, and viewing options continue to function, but all editing features are disabled.
To remove the Mark as Final setting and restore edit functions repeat step 1, above. Alternatively, you can click the Edit Anyway button displayed on the info bar in the backstage view .